


 |
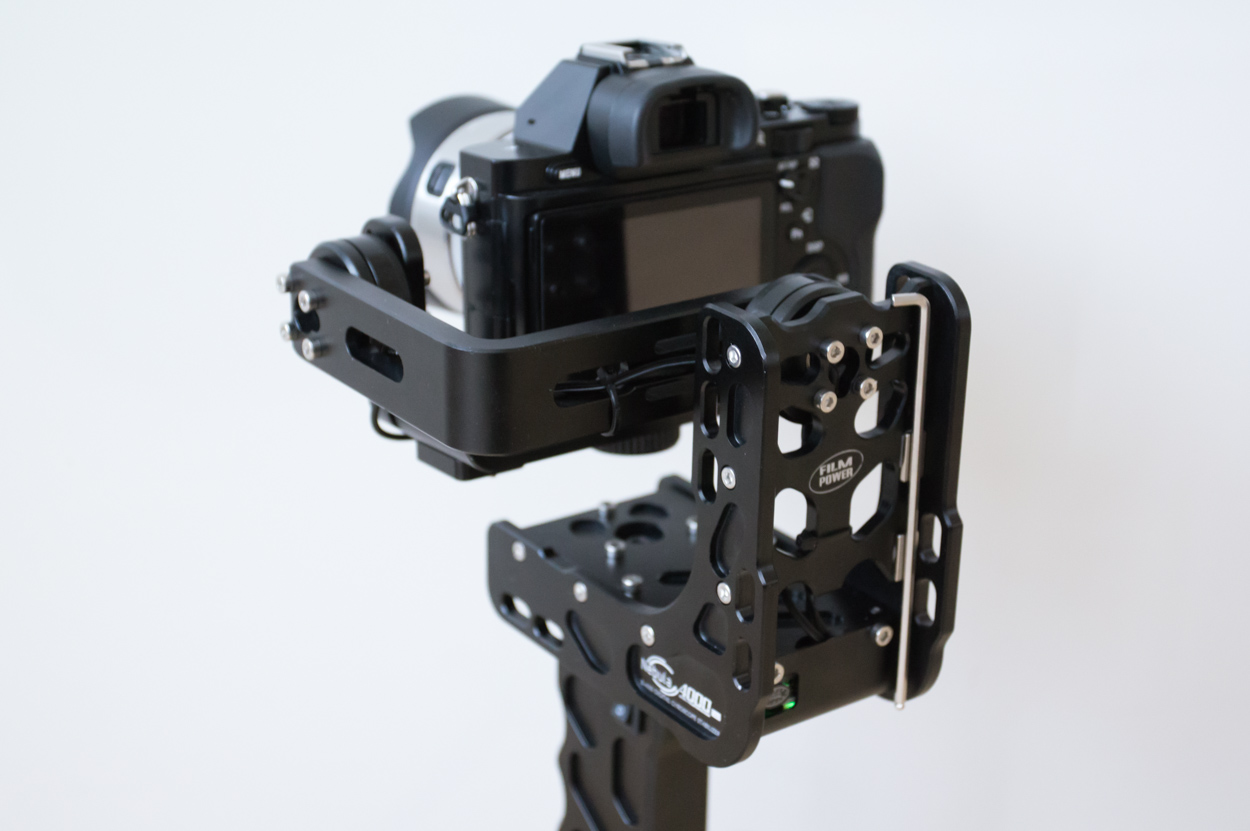
| Sony A7s on the Nebula 4000 Lite 3-axis gyroscope stabilizer |
Last week I received my Nebula 4000 Lite from Camera Motion Research. This is a 3-Axis gyroscope stabilizer from FilmPower that I've been really interested in. A few months ago I saw a video online of someone (test) flying a Sony A7s in front of mirrors and I could hardly believe it was real. A MōVI / Ronin like device, only a lot smaller, single handed operation, lightweight and affordable. About two years ago the first (noticeable) handheld gyro-stabilizer was introduced and it took the market by storm. With this device you were able to get Steadicam like shots, only it's all relying on electronics instead of "analog" balance. It makes it very easy to get nice moving shots with your camera, even when you're working in unfriendly Steadicam conditions. It enables you to get even more creative shots and it doesn't take months or even years of training to be able to use it properly. Now, only two years later, we can get all of this great technology in a small and lightweight device that you can easily carry around with you. It's incredible to see how fast things are changing in the world of filmmakers.
 |
| Ah yes, filming in the old days. Much simpeler times... |
 |
| Who doesn't like unboxing camera stuff! |
First time balancing the camera takes a bit of getting used to. It helps having prior experience balancing a stabilizer, but new users will be able to quickly pick up on this. Balancing is the first and most important step you need to take before being able to fly your camera. Make sure you take enough time to do this right and watch the online video manual for additional help. Once you have obtained a proper balance you can power up the Nebula. Once it's switched on you can just pick it up and start filming! I was happily surprised with the fist couple of shots I got with my Sony A7s with Sony FE 28-70mm lens. It was just like flying my camera on a stabilizer for the first time, only I got much better results this time. ;)
 |
| Sony A7s with the FE 28-70mm lens perfectly balanced on the Nebula |
I've been doing a lot of research on different lightweight wide angle options for the Sony A7s, since my Canon wide angle lens with Metabones adapter would be too heavy for it. Eventually I decided to go for an APS-C lens, the Sony 16mm pancake with the ultra wide converter. The Voigtländer wide (full frame) lens also was an interesting option, but in the end I didn't like the amount of vignetting it shows on screen. Also, filming with crop mode ensures me I won't have any problems with rolling shutter when doing a fast camera move. I received the wide lens a day later and had to re-balance the camera on the Nebula, which only took a few minutes.
 |
| Re-balanced the Nebula to work with the Sony A7s, pancake lens and wide converter |
Now it was time for me to start working with the SimpleBGC_GUI software and see if I could improve the performance by tailoring the settings to the specific camera and lens combination. After spending quite some time on this I came up with the following cheat sheet:
- Power at low values means: you can get higher P and D values
- When power is too low, the motor can "give up" and lose a step or two
- The P-value tries to keep the current camera angle (in other words the '0' angle').
- When the P value is too high it will cause vibrations
- I-value is the speed in which the gimbal returns to '0' (normal gimbal position) after a shake or other disturbance.
- The D value smooth things out and gets rid of low-frequency vibrations.
- When the P value is too high it will result in a high-frequency vibration.
- Always try to aim for somewhat higher D values.
It isn't much, but at least gives you some guidelines to work with. The thing that helped me the most, was working on one axis at a time by only looking at either the GYRO_X (roll), GYRO_Y (tilt) or GYRO_Z (yaw) graph at the Realtime Data tab and switching off all other's. Recalibrating the acceleration is also a good idea when your changing settings. Working with the software can feel a bit overwhelming at first, but it can do wonders in performance and definitely is worth spending time on. The weather has been stormy the last couple of days so I had enough time to work with the software until the weather cleared up. As soon as it did, I grabbed my camera and the Nebula and started filming.
UPDATE new video online:
Results
Overall I'm very pleased with the footage. The only thing I wasn't quite happy with yet, was the 'Yaw' performance which I spend most time on. Someone recognized the problem I had with it and told me to change something in the settings (the Deadband degrees setting) to get smoother panning results. After that I did some more tweaking with the software until I had three different profiles ready for the Nebula. All three can be used for different type of shots. The first one is a follow mode profile for getting fluid panning and tilting shots, the second is for panning only, so the camera will stay perfectly level in the tilt direction, and the third profile will lock the panning but still gives you the abbility to use tilt which can give you a nice straight dolly-shot move. FYI, on all profiles I turned off the somewhat annoying confirmation beeping sounds.
Download profile settings
I tried to optimize all three profile settings for their individual needs and tried to reduce unwanted shakes and vibrations. If you have the same camera setup as I do (Sony A7s, with pancake and ultra wide converter), then you're in luck! Because I will share all three settings with you, so that you can try and use them with your own Nebula.
Download profile 1 (follow mode)
Download profile 2 (tilt lock only)
Download profile 3 (pan lock only)
Download profile used for the first video
Download profile 2 (tilt lock only)
Download profile 3 (pan lock only)
Download profile used for the first video
TIP: You might need to do an auto-adjust on the offset settings at the follow tab to get better results.
Service and quality
Camera Motion Research is an official dealer for the Nebula 4000 Lite in the U.S.A., ships worldwide and always provide fantastic service to their customers. They've added an improved allen wrench that can be easily attached to the back of the Nebula 4000, thanks to a small modification they did. So you won't loose the wrench and always have it available when needed. It's a short arm wrench that will allow you to loosen and tighten the pitch and roll arm screws. Most of the time you won't even have to remove your camera! The second thing they did was finding a perfect accessory for the Nebula 4000, an optional tripod mount, to provide a sturdy base for resting or working with the Nebula. You can also order an external battery that attaches to the underside of the handle for longer operation time.
 |
| The allen wrench will simply snap back into place thanks to this solution from CMR |
 |
| With this optional tripod base, the Nebula can safely stand on any surface |
The Nebula 4000 Lite surprised me in almost every way. Just like working with any Steadicam or stabilizer, it does require some practice and time to get the most out of it, but it's definitely worth it. For me personally this is the kind of electronic stabilizer I've been waiting for. Lightweight, single handed operation, simple to use, great results and affordable. Although it doesn't make Steadicams obsolete, it's coming dangerously close and is a real game changer. So should you buy it? Well, let me put it this way. I wish I already had this device years ago while working on different productions. It would have saved me lots of time and many troubles! But for now, I need to be thankful for being able to work with it from now on forward.

Nice write up!
ReplyDeletei just got mine, where do you think is a good place to start learning basecam BGC software?
Thanks! Best place to start would be YouTube, watching videos that go through the different settings and options. You could also use the little cheat sheet I created to get you up and running. But make sure to save all three default profile settings first, before making changes.
DeleteI am using the same set-up as you but I just don't have the ultra-wide adapter. Do you think your profile settings would still work with just the a7s and 16mm pancake?
ReplyDeleteWithout the extra weight of the wide adapter, the motors might be getting too much power which might result in micro vibrations showing up in the footage. Best thing would be to try it out. If you decide to give it a try, please let me know how it goes!
Deletehi, any profiles for Sony a7s + sony 10-18mm/f4 OSS ?Thanks.
ReplyDeleteSorry, I only have profiles for the pancake with ultra wide converter.
DeleteHi Derran– urgent situation here, any help would be appreciated! I'm writing from BRAVÒ a leading video agency in nyc( brv.xxx) our founder is in Chile right now for an important fashion shoot tomorrow! Unfortunately our Nebula seems to be out of wack…. We have the Nebula 4000 with the Sony A7sii and the 28-70mm lens. If you don’t have these settings available for download, could you share the PID values? As mentioned, it would mean the world to us! I'd be happy to return the favor for the information... Thank you for reading- let us know if theres anyway to help.
ReplyDeleteHi, I would like to help out, but unfortunately I don't have any profiles saved from working with the 28-70mm lens. I do remember however that the default settings of the Nebula worked pretty good with the A7s and 28-70 lens combo. I still have both default profile 1 and 2 stored, so in case you don't have them anymore I've uploaded them so that you can get them through these two links: https://www.dropbox.com/s/o03a11v1b4qnrxm/Default_Profile1.profile?dl=0 and https://www.dropbox.com/s/naeira51w5ug2du/Default_Profile2.profile?dl=0 Hope this helps!
DeleteHi, great review. I just got a second hand one and seems to have a problem with it. I balanced it properly, but when I turn it ON, it goes crazy, turning all the way up and down or left and right. I've tried all modes, but I couldn't get it right for some reason. Should I reset for default settings? Any idea would be helpful, Thanks. Rob
ReplyDeleteHi, if you can get your hands on the default profile settings you could load them onto the Nebula and use that as a new starting point. Or try to decrease the power send to each individual motor to see if it stops the crazy moves when switching it on. It could be that the Nebula you got is tuned for a heavier camera. If I'm not mistaken, there's a warning in the manual (or online video manual), to never touch the reset button on the software since it may cause the Nebula to malfunction and it will be almost impossible to get it working after that. Not sure if that's true or that you could just load another profile to get it working again, but I would like to suggest to try out different settings and perhaps other profile settings found online first, to see if that gets you closer to a normal responding Nebula. Good luck!
DeleteHi, great review. I just got a second hand one and seems to have a problem with it. I balanced it properly, but when I turn it ON, it goes crazy, turning all the way up and down or left and right. I've tried all modes, but I couldn't get it right for some reason. Should I reset for default settings? Any idea would be helpful, Thanks. Rob
ReplyDeleteHi there! Great article! How would i go about opening the profiles that you have posted? My phone wont let me extract the folder. Hlp plz
ReplyDelete